
sheet metal introduction

Also Read

Sheet metal Introduction

Sheet Metal Introduction

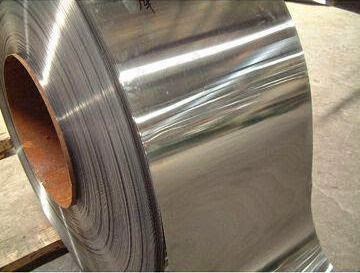
Sheet metal is simply metal formed into thin and flat pieces. It is one of the fundamental forms used in metalworking, and can be cut and bent into a variety of different shapes. Countless everyday objects are constructed of the material. Thicknesses can vary significantly, although extremely thin thicknesses are considered foil or leaf, and pieces thicker than 6 mm (0.25 in) are considered plate.


Uses of Sheet metal:-

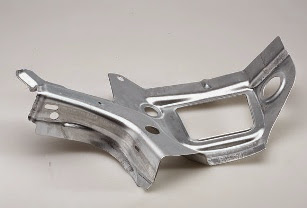
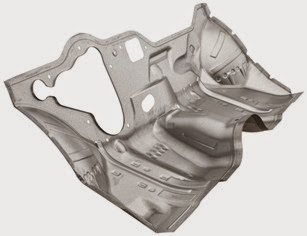
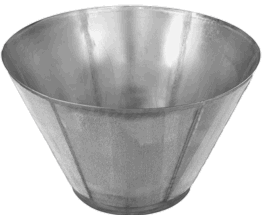
For making buckets, duct, pans, Gutters, tanks, boxes, food containers, dairy equipments, cans, radiators in automobiles, chemical plants, and domestic heating appliances, construction of airplanes, Refrigerators, house hold utensils and fabrication work for making bus bodies etc,. by using various metals like Galvanized iron(GI), Black iron, Tin plate, Stainless steel, Copper, Aluminum etc,..

Sheet metal Tools Required:-

Plate gauge:-

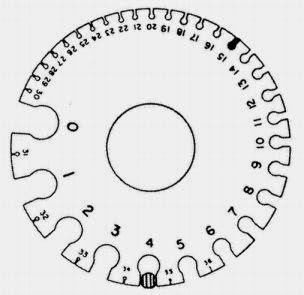
Used for measure thickness of sheets.
The most commonly used gauge in sheet metal has 21 slots with gauge numbers ranging from 4 to 24.


Steel rule:-

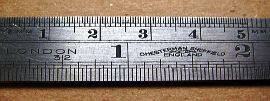
Used for taking linear measurement. The accuracy is 0.5mm in metric and 1/64 inch in British system.


Flexible push pull rule:-

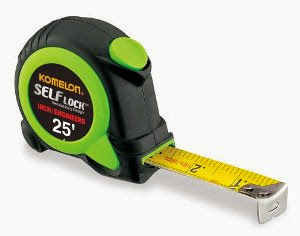
Used for measuring long dimensions. Generally the maximum length of the role is 10meters


Scriber :-

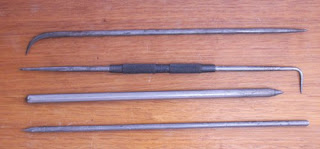
Used when we draw marking lines on metal surface.


Divider:-

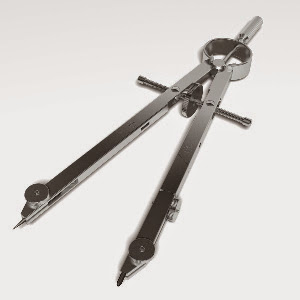
It is used for transferring the sizes.Scribing curves, Circles on a sheet metal with small raids.


Trammel points:-

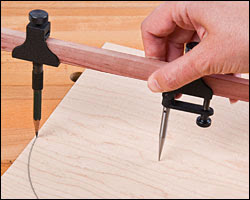
Used for drawing very large circles and arcs on sheet metal surface.


Steel square(Try square):-

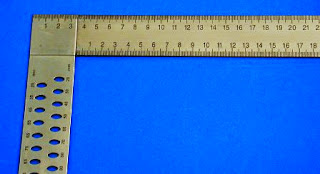
Used for accurate laying out work. For marking dimensions perpendicular to any base.


Semi circular protractor:-

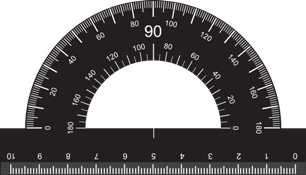
Used for setting bevels, transferring angles. The indicating arm of the blade has line graduations for accurately setting and reading the protractor.


Punch:-

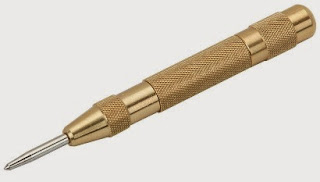
Made with tool steel. The point and head is hardened and tempered. Shank is knurled to provide grip.The point angle is 60 degrees to 90 degrees.Used to punch dotted lines on sheet metal.


Mallet:-

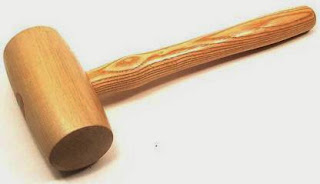
Used whenever light blows are required.


Riveting hammer :-

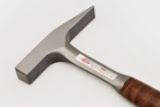
Used for forming rivet heads


Raising hammer:-

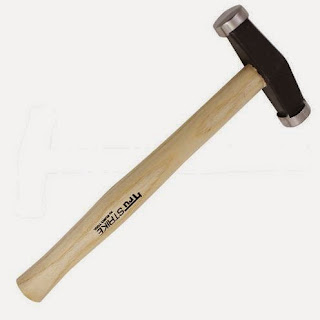
Used for making depressions with a flat chisel.Used for removing small marks or indentations from the job surface. To true the shape of the work and to smoothen finished work


Back button

Comments

Andrea Lim said…
Thank You Very Much For Great Post Find here Stainless Steel Sheet, SS Sheets manufacturers, suppliers & exporters in Singapore. Get contact details & address of companies manufacturing Stainless Steel Sheets

Recent posts

Welding VIVA question and answers

VIVA QUESTIONS : Q1: Define welding? Ans:  Welding is a fabrication process that joins two or more materials, typically metals or thermoplastics, by melting and fusing them together using heat or pressure. Q2: What is the typical thickness of MS Plate used in general welding workshop experiments? Ans:  The thickness of the MS (Mild Steel) plate used in general welding workshop experiments can vary depending on the specific requirements of the experiment. However, commonly used thicknesses range from 3 mm to 12 mm. Q3: What is the common job material used in welding experiments? Ans:  The common job material used in welding experiments is mild steel. It is widely available, affordable, and relatively easy to work with, making it suitable for various welding applications and practice. Q4: What is the main function of an electrode in welding? Ans:  The main function of an electrode in welding is to carry the electric current necessary for the welding process and to provide filler mate

Coordinate systems in AutoCAD

World Coordinate System (WCS), User Coordinate System (UCS). There is 4 AutoCAD coordinates system you should know. Absolute coordinate system , Relative Rectangular coordinate system, Relative Polar coordinate system and Interactive system(Direct coordinate system). Absolute Coordinate system: Absolute Coordinates uses the Cartesian System to specify a position in the X, Y, and (if needed) Z axes to locate a point from the 0-X, 0-Y, and 0-Z (0,0,0) point. To locate a point using the Absolute Coordinate system, type the X-value, Y-value, and, if needed, the Z-value separated by commas (with no spaces). Syn: Enter LINE command: L [Enter] Start line at point A: 0,0 [Enter] End first line at point B: 2,2 [Enter] End of second line at point C: 2,3 [Enter] Examples shown bellow. Relative Rectangular Coordinate system: After first points entered, your next points can be entered by specifying the next coordinate compare/relative f

sheet metal rectangular tray making

Aim :- To make a rectangular tray from a given metallic sheet. Tools Required MALLET Snip Stake STEEL RULE Ball peen HAMMER Straight EDGE RIVETS Scriber Procedure The given metal sheet is smoothed using mallet. The measurements of rectangular tray (tray development drawing) is drawn on the sheet with given dimensions using the scriber and steel rule. The sheet is cut as per the marked dimensions by straight snips. Fold or bend as per the given order using mallet and stake. Bending is done as per the given dimension using the stake and mallet. Rivet the folded sheet by using the given rivets and hammer. Safety Precautions Each cut you make exposes sharp edges and creates burrs that can slice a finger. Must Use Hand gloves when cutting the sheet. Metal waste also has hazardous edges. So

step by step procedure to draw hook 2D drawing using AutoCAD

1. Create one vertical line and two horizontal lines like shown below according to dimensions. 2.Draw the circles at intersecting points like shown below with given dimensions. 3. Draw TTR (tangent tangent Radius) circles like shown below with given radius values. 4. Trim extra elements using " TR " command the final image be shown like below. 5. Now draw another reference lines and circles using TTR(tangent tangent Radius) circle according to given dimensions. 6. Now Trim the extra elements by using "TR" command. 7. Now dimension the elements using DIM command.

Fluid mechanics VIVA QUESTIONS and ANSWERS

1. Define density? Ans: It is defined as the ratio of mass per unit volume of the fluid. 2. Define viscosity? Ans: It is defined as the property of fluid which offers resistance to the movement of fluid over another adjacent layer of the fluid. 3. Differentiate between real fluids and ideal fluids? Ans: A fluid, which is in-compressible and is having no viscosity, is known as ideal fluid while the fluid, which possesses viscosity, is known as real fluid. 4. What is a venturimeter? Ans: It is a device which is used for measuring the rate of flow of fluid flowing through pipe. 5. What is a notch? Ans: A notch is a device used for measuring the rate of flow of a fluid through a small channel or a tank. 6. Define buoyancy? Ans: When a body is immersed in a fluid, an upward force is exerted by the fluid on the body. This upward force is equal to the weight of the fluid displaced by the body. 7. Define meta-centre? Ans: It is defined as the point about which a body

FACING, PLAIN TURNING AND STEP TURNING

Ex. No :                                                                                                          Date : FACING, PLAIN TURNING AND STEP TURNING Aim                       To perform turning, facing and chamfering on a cylindrical work piece. Material used                       Mild steel cylindrical rod. Tools required Lathe Three-jaw chuck Chuck key Vernier caliper Single-point cutting tool Procedure First loosen the jaw in the chuck key to position the work piece, and then tighten the  jaws. Fix the cutting tool in the toolpost. Switch on the lathe and move the carriage near to the workpiece. Give it a small cross  feed, and then move carriage longitudinally to the required length slowly. Bring the carriage to the original position, give a small cross feed and move carriage  longitudinally. Repeat this step until required diameter is obtained. To get smooth surface give a very small feed when the diameter is nearing

SINGLE ‘V’ BUTT JOINT

Experiment No.:                                                                                      Date: SINGLE ‘V’ BUTT JOINT Aim: To prepare a single ‘V’ Butt Joint as per dimensions given in the sketch. Material Required: Mild Steel plates: 80mm X 40mm X 6mm = 2 Nos Mild Steel electrode ¢ 3.15 mm Equipment required: A.C. Transformer with all welding accessories like Electrode holder, cables. Tool Required: Steel rule 300mm  Scriber 150mm Flat file 300mm Try square 200mm Flat Tong 450mm  Chipping hammer 200mm Ball peen hammer 750mm  Wire brush Welding screen Sequence of Operations: 1. Marking  2. Filing  3. Welding  4. Finishing Procedure: Take two Mild steel plates of size 80mm X 40mm X 6mm. Fix the work pieces one by one in bench vice and file the faces of work pieces using flat file as per dimensions. Then mark the pieces using steel rule and scriber as per drawing. Again fix the work pieces one by one in bench vice and file the pieces to

MOULD WITH SPLIT PATTERN

Ex. No :                                                                                       Date : MOULD WITH SPLIT PATTERN Aim To make the mould for the given split pattern. Material required •  Moulding board •  Riser pin •  Moulding box •  Sprue pin •  Green sand •  Rammer •  Trowel •  Lifter •  Riddle •  Draw spike •  Gate cutter  •  Bellow •  Vent rod  Procedure 1. Place the moulding board on a horizontal surface. 2. The drag box is placed above the moulding board. Now one piece      of pattern is kept at  center of the drag as shown in figure. 3. The parting sand is spread before we keep the pattern. 4. Facing sand is sprinkled over the pattern to a depth of 2mm. then      greensand is filled  over it. 5. Proper ramming is done on the green sand to get a air free                  packing. 6. Excess sand is remove with strike off bar. 7. The drag is inverted upside down. 8. The cope box is place over the drag box. 9.

Boring operation on lathe machine

Ex. No :                                                                                                         Date : BORING Aim To perform boring on a cylindrical work piece. Material used Mild steel rod. Tools required Lathe Three-jaw chuck Chuck key Vernier caliper Cutting tools Procedure First loosen the jaw in the chuck key to position the work piece, and then tighten the  jaws. Fix the cutting tool in the toolpost. Switch on the lathe and move the carriage near to the workpiece. Give it a small cross  feed, and then move carriage longitudinally to the required length slowly. Bring the carriage to the original position, give a small cross feed and move carriage  longitudinally. Repeat this step until required diameter is obtained. To get smooth surface give a very small feed when the diameter is nearing the  required value. The drill bit is fixed in the tail stock. The hole is made by moving the tailstock through over the bed.

TIN SMITHY & Sheet metal

TIN SMITHY Introduction : Many engineering and house articles such as boxes, cans, funnels, ducts etc. are made from a flat sheet of metal. The process being known as tin smithy. For this the development of the article is first drawn on the sheet metal, then cut and folded, to form the required shape of the article. Allowance should be given in the drawing stage for folding and bending. This allowance depends upon the radius of the bend and thickness of the sheet metal. Sheet Metal Materials : A variety of metals are used in a sheet metal shop such as galvanized Iron, black, Iron, tin, Stainless Steel, copper and Aluminium. Hand Tools : The common hand tools used in sheet metal work are steel, try square, Wire gauge, Scriber, Ball peen hammer, Nylon Mallet, Snips Divider, Stakes, Cutting plier and Soldering Iron. Here, the details of tools that are being equipped by our workshop purpose only are presented. Wire Gauge: The thickness of sheet is referred in numbers known

Search This Blog