

Also Read
World Coordinate System (WCS), User Coordinate System (UCS).
There is 4 AutoCAD coordinates system you should know. Absolute coordinate system, Relative Rectangular coordinate system, Relative Polar coordinate system and Interactive system(Direct coordinate system).
Absolute Coordinate system:
Absolute Coordinates uses the Cartesian System to specify a position in the X, Y, and (if needed) Z axes to locate a point from the 0-X, 0-Y, and 0-Z (0,0,0) point. To locate a point using the Absolute Coordinate system, type the X-value, Y-value, and, if needed, the Z-value separated by commas (with no spaces).
Relative Rectangular Coordinate system:
After first points entered, your next points can be entered by specifying the next coordinate compare/relative from the first points. The relative coordinate started with symbol “@” tell AutoCAD it was a relative coordinates. Using relative coordinate, points entered by typing @x,y [Enter].
(Defines a new point that is X units horizontally and Y units vertically away from the current point.)

There is 4 AutoCAD coordinates system you should know. Absolute coordinate system, Relative Rectangular coordinate system, Relative Polar coordinate system and Interactive system(Direct coordinate system).
Absolute Coordinate system:
Absolute Coordinates uses the Cartesian System to specify a position in the X, Y, and (if needed) Z axes to locate a point from the 0-X, 0-Y, and 0-Z (0,0,0) point. To locate a point using the Absolute Coordinate system, type the X-value, Y-value, and, if needed, the Z-value separated by commas (with no spaces).

Syn:
Enter LINE command: L [Enter]
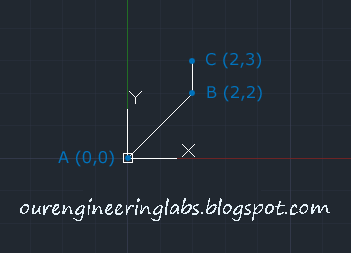
Start line at point A: 0,0 [Enter]
End first line at point B: 2,2 [Enter]
End of second line at point C: 2,3 [Enter]
Start line at point A: 0,0 [Enter]
End first line at point B: 2,2 [Enter]
End of second line at point C: 2,3 [Enter]
Examples shown bellow.
After first points entered, your next points can be entered by specifying the next coordinate compare/relative from the first points. The relative coordinate started with symbol “@” tell AutoCAD it was a relative coordinates. Using relative coordinate, points entered by typing @x,y [Enter].
(Defines a new point that is X units horizontally and Y units vertically away from the current point.)

Syn:
Enter LINE command: L [Enter]
Start line at point A: 0,0 [Enter]
End first line at point B: @2,2 [Enter]
End of second line at point C: @0,1 [Enter]
Examples shown bellow.
Start line at point A: 0,0 [Enter]
End first line at point B: @2,2 [Enter]
End of second line at point C: @0,1 [Enter]
Relative Polar coordinate system:
Polar coordinates used when you need to draw the next points at specify angle. Polar coordinates system in AutoCAD specifies distance length at which angle. Using polar coordinate, points entered by typing @distance<angle [Enter].
(Defines a new point that is the specified distance units away from the current point at the specified angle from the origin.) Polar coordinates used when you need to draw the next points at specify angle. Polar coordinates system in AutoCAD specifies distance length at which angle. Using polar coordinate, points entered by typing @distance<angle [Enter].

Syn:
Enter LINE command: L [Enter]
Start line at point A: 0,0 [Enter]
End first line at point B: @2.828<45 [Enter]
End of second line at point C: @1<90 [Enter]
Direct Entry Method System
Examples shown bellow.
This is the most common and easiest system used for drafting in Autocad. Values are provided through keyboard and direction is guided through the mouse.

Enter LINE(L) command: L [Enter]
Start line : 10,10 [Enter]
and place the cross hair(Mouse) at which direction you want then enter the length of that directional line.
then press enter
Example1 for Absolute co-ordinate system

Example2 for Absolute co-ordinate system

Example for Relative co-ordinate (Relative Rectangular co-ordinate) System.

Example for Relative polar co-ordinate system


Comments