Forging and smithy operations

Also Read

UPSETTING

upset forging example
  • Increases the thickness (or diameter) of a bar and reduces its length.
  • Portion of the bar which is to be upset is heated locally.
  • Blow of the hammer must be in line with the bar to prevent bending of the bar.
upset forging operation stepsupsetting example image
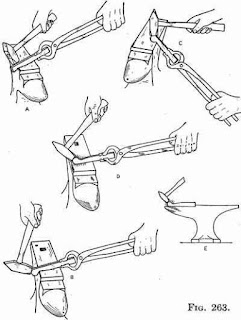
BENDING
  • Bending of bars, flats and other similar stock material is usually done in a smithy shop. This can be done to produce different types of bent shapes such as angles, ovals and circles, etc.
  • Any desired angle can be made through this operation. For making a right angle bend that particular portion of the stock, which is to be subjected to bending, is heated and jumped on the outer surface.
  • This operation is carried out on the edge of the anvil or on the perfectly square edge of a rectangular block. After bending, the outside bulging is finished by means of a flatter and the inside one by means of a set hammer.
  • Curved shapes of bends are formed on the horn of the anvil. For mass production of articles made through bending, particularly when dimensional accuracy is a must, jigs and fixtures are designed to help in performing this operation quickly and efficiently. This results in a considerable saving of time and labour. 
bending

forging bending


DRAWING DOWN
  • This process is also known as drawing out. It is exactly a reverse process to that of upsetting in the sense, it is employed when a reduction in thickness, width or both of a bar is desired with a corresponding increase in its length. The desired effect is possible to be obtained by the use of either the peen of a cross peen hammer, a set of fullers or a pair of swages (for round bars only).
  • The process of heating and cooling the length, not required to be drawn, is the same as in case of upsetting, but the selection of the above tools is governed by the shape of the cross-section of the stock, the amount by which the increase in length is desired and also the required finished shape of the job.


PUNCHING and DRIFTING
  • Punching and drifting are used for producing and finishing holes and preparatory for producing other shapes.Punching should be done in two stages. 
  • In the first stage the work piece is kept flat on the anvil and holes performed half way through. Then job is turned upside down. 
  • The application of punching, producing the slot a number of holes are punched and the remaining excess material is cut out using a chisel. The slot may then be finished hot drifting or may be finished by filing when cold. 
  • Drifting: By this process punched hole enlarged.
punching_forging
Drifting
FLATTENING
  • Reduce the thickness of job to required shape.
  • The flattening is carried out after drawing out, fullering or any other operation to remove the fullering marks for leveling and finishing flat surfaces
smithy-forging-flattening
Flattening
FULLERING
  • Heated stock is placed on Fuller fixed on Anvil.
  • A Fuller is put over the stock and hammering is done.
  • Reduce the cross section of the job at required point.
forging fullering
smithy-forging-fullering
SWAGING
  • Produce a bar with a smaller diameter (using concave dies).
  • Usually done at the ends to make metal ready for next forming process.
  • Provides a reduced round cross section suitable for taping, threading, upsetting.
forging-smithy-swaging

swaging-operation

Comments

donnaj edwards said…
Very informative and impressive post you have written, this is quite interesting and i have went through it completely, an upgraded information is shared, keep sharing such valuable information. iManage Work

Recent posts

sheet metal rectangular tray making

Aim :- To make a rectangular tray from a given metallic sheet. Tools Required MALLET Snip Stake STEEL RULE Ball peen HAMMER Straight EDGE RIVETS Scriber Procedure The given metal sheet is smoothed using mallet. The measurements of rectangular tray (tray development drawing) is drawn on the sheet with given dimensions using the scriber and steel rule. The sheet is cut as per the marked dimensions by straight snips. Fold or bend as per the given order using mallet and stake. Bending is done as per the given dimension using the stake and mallet. Rivet the folded sheet by using the given rivets and hammer. Safety Precautions Each cut you make exposes sharp edges and creates burrs that can slice a finger. Must Use Hand gloves when cutting the sheet. Metal waste also has hazardous edges. So

Coordinate systems in AutoCAD

World Coordinate System (WCS), User Coordinate System (UCS). There is 4 AutoCAD coordinates system you should know. Absolute coordinate system , Relative Rectangular coordinate system, Relative Polar coordinate system and Interactive system(Direct coordinate system). Absolute Coordinate system: Absolute Coordinates uses the Cartesian System to specify a position in the X, Y, and (if needed) Z axes to locate a point from the 0-X, 0-Y, and 0-Z (0,0,0) point. To locate a point using the Absolute Coordinate system, type the X-value, Y-value, and, if needed, the Z-value separated by commas (with no spaces). Syn: Enter LINE command: L [Enter] Start line at point A: 0,0 [Enter] End first line at point B: 2,2 [Enter] End of second line at point C: 2,3 [Enter] Examples shown bellow. Relative Rectangular Coordinate system: After first points entered, your next points can be entered by specifying the next coordinate compare/relative f

Fluid mechanics VIVA QUESTIONS and ANSWERS

1. Define density? Ans: It is defined as the ratio of mass per unit volume of the fluid. 2. Define viscosity? Ans: It is defined as the property of fluid which offers resistance to the movement of fluid over another adjacent layer of the fluid. 3. Differentiate between real fluids and ideal fluids? Ans: A fluid, which is in-compressible and is having no viscosity, is known as ideal fluid while the fluid, which possesses viscosity, is known as real fluid. 4. What is a venturimeter? Ans: It is a device which is used for measuring the rate of flow of fluid flowing through pipe. 5. What is a notch? Ans: A notch is a device used for measuring the rate of flow of a fluid through a small channel or a tank. 6. Define buoyancy? Ans: When a body is immersed in a fluid, an upward force is exerted by the fluid on the body. This upward force is equal to the weight of the fluid displaced by the body. 7. Define meta-centre? Ans: It is defined as the point about which a body

Welding VIVA question and answers

VIVA QUESTIONS : Q1: Define welding? Ans:  Welding is a fabrication process that joins two or more materials, typically metals or thermoplastics, by melting and fusing them together using heat or pressure. Q2: What is the typical thickness of MS Plate used in general welding workshop experiments? Ans:  The thickness of the MS (Mild Steel) plate used in general welding workshop experiments can vary depending on the specific requirements of the experiment. However, commonly used thicknesses range from 3 mm to 12 mm. Q3: What is the common job material used in welding experiments? Ans:  The common job material used in welding experiments is mild steel. It is widely available, affordable, and relatively easy to work with, making it suitable for various welding applications and practice. Q4: What is the main function of an electrode in welding? Ans:  The main function of an electrode in welding is to carry the electric current necessary for the welding process and to provide filler mate

step by step procedure to draw hook 2D drawing using AutoCAD

1. Create one vertical line and two horizontal lines like shown below according to dimensions. 2.Draw the circles at intersecting points like shown below with given dimensions. 3. Draw TTR (tangent tangent Radius) circles like shown below with given radius values. 4. Trim extra elements using " TR " command the final image be shown like below. 5. Now draw another reference lines and circles using TTR(tangent tangent Radius) circle according to given dimensions. 6. Now Trim the extra elements by using "TR" command. 7. Now dimension the elements using DIM command.

FACING, PLAIN TURNING AND STEP TURNING

Ex. No :                                                                                                          Date : FACING, PLAIN TURNING AND STEP TURNING Aim                       To perform turning, facing and chamfering on a cylindrical work piece. Material used                       Mild steel cylindrical rod. Tools required Lathe Three-jaw chuck Chuck key Vernier caliper Single-point cutting tool Procedure First loosen the jaw in the chuck key to position the work piece, and then tighten the  jaws. Fix the cutting tool in the toolpost. Switch on the lathe and move the carriage near to the workpiece. Give it a small cross  feed, and then move carriage longitudinally to the required length slowly. Bring the carriage to the original position, give a small cross feed and move carriage  longitudinally. Repeat this step until required diameter is obtained. To get smooth surface give a very small feed when the diameter is nearing

Boring operation on lathe machine

Ex. No :                                                                                                         Date : BORING Aim To perform boring on a cylindrical work piece. Material used Mild steel rod. Tools required Lathe Three-jaw chuck Chuck key Vernier caliper Cutting tools Procedure First loosen the jaw in the chuck key to position the work piece, and then tighten the  jaws. Fix the cutting tool in the toolpost. Switch on the lathe and move the carriage near to the workpiece. Give it a small cross  feed, and then move carriage longitudinally to the required length slowly. Bring the carriage to the original position, give a small cross feed and move carriage  longitudinally. Repeat this step until required diameter is obtained. To get smooth surface give a very small feed when the diameter is nearing the  required value. The drill bit is fixed in the tail stock. The hole is made by moving the tailstock through over the bed.

TIN SMITHY & Sheet metal

TIN SMITHY Introduction : Many engineering and house articles such as boxes, cans, funnels, ducts etc. are made from a flat sheet of metal. The process being known as tin smithy. For this the development of the article is first drawn on the sheet metal, then cut and folded, to form the required shape of the article. Allowance should be given in the drawing stage for folding and bending. This allowance depends upon the radius of the bend and thickness of the sheet metal. Sheet Metal Materials : A variety of metals are used in a sheet metal shop such as galvanized Iron, black, Iron, tin, Stainless Steel, copper and Aluminium. Hand Tools : The common hand tools used in sheet metal work are steel, try square, Wire gauge, Scriber, Ball peen hammer, Nylon Mallet, Snips Divider, Stakes, Cutting plier and Soldering Iron. Here, the details of tools that are being equipped by our workshop purpose only are presented. Wire Gauge: The thickness of sheet is referred in numbers known

SINGLE ‘V’ BUTT JOINT

Experiment No.:                                                                                      Date: SINGLE ‘V’ BUTT JOINT Aim: To prepare a single ‘V’ Butt Joint as per dimensions given in the sketch. Material Required: Mild Steel plates: 80mm X 40mm X 6mm = 2 Nos Mild Steel electrode ¢ 3.15 mm Equipment required: A.C. Transformer with all welding accessories like Electrode holder, cables. Tool Required: Steel rule 300mm  Scriber 150mm Flat file 300mm Try square 200mm Flat Tong 450mm  Chipping hammer 200mm Ball peen hammer 750mm  Wire brush Welding screen Sequence of Operations: 1. Marking  2. Filing  3. Welding  4. Finishing Procedure: Take two Mild steel plates of size 80mm X 40mm X 6mm. Fix the work pieces one by one in bench vice and file the faces of work pieces using flat file as per dimensions. Then mark the pieces using steel rule and scriber as per drawing. Again fix the work pieces one by one in bench vice and file the pieces to

Welding-TEE FILLET JOINT

Ex. No :                                                                                 Date : TEE FILLET JOINT Aim To join the given two work pieces as a ‘Tee fillet joint’ by arc Welding. Material used Mild steel plates. Tools required • Welding power supply • Flat file • Welding rod • Chipping hammer • Electrode holder • Wire brush • Gloves and apron  • Earthing clamps • Shield and goggles Procedure The given workpieces are thoroughly cleaned, i.e. rust, scales are removed and the  edges are filed. The electrode is held in an electrode holder and ground clamp is clamped to the  welding plates and the power is supplied. The workpieces are positioned on the table to form a “Tee fillet joint”. The tag weld is done on the both the ends of joining plates to avoid the movement of  workpieces during welding. The welding is carried throughout the length of the workpieces on both sides by  maintaining 3mm gap between plates and the weldin

Search This Blog